Illustrator
- Sophie Litchfield

- Sep 27, 2018
- 6 min read
Updated: Apr 24, 2019
Over the time of my course I have learnt how to use Illustrator and the basics of making images.
New Document Settings (page size, do presets, CMYK, RGB)
CMYK is a scheme for combining primary pigments. The C stands for cyan (aqua), M stands for magenta (pink), Y for yellow, and K for Key. The key colour in today's printing world is black but it has not always been.
RGB (red, green, and blue) refers to a system for representing the colours to be used on a computer display. Red, green, and blue can be combined in various proportions to obtain any colour in the visible spectrum. Levels of R, G, and B can each range from 0 to 100 percent of full intensity.
Workspace

Tools Panel

The tools panel contains tools for creating and editing images, artwork, page elements, and so on. Related tools are grouped.
Selection Tools (selection, direct selection)

The Selection tool (V) selects entire objects.
The Direct Selection tool (A) selects points or path segments within objects.
Magnifying Tool (zoom in, zoom out)

The Zoom tool (Z) increases and decreases the view magnification in the illustration window.
Saving & Exporting
Pen Tools

The Pen tool (P) draws straight and curved lines to create objects.

Hand Tool

The Hand tool (H) moves the Illustrator art-board within the illustration window.
Smooth Tool

The Smooth tool smooths Bezier paths.
Eraser Tool

The Eraser tool (Shift-E) erases any area of the object over which you drag.
Type Tool

The Type tool (T) creates individual type and type containers and lets you enter and edit type.

The Area Type tool changes closed paths to type containers and lets you enter and edit type within them.
The Type On A Path tool changes paths to type paths, and lets you enter and edit type on them.
The Vertical Type tool creates vertical type and vertical type containers and lets you enter and edit vertical type.
The Vertical Area Type tool changes closed paths to vertical type containers and lets you enter and edit type within them.
The Vertical Type On A Path tool changes paths to vertical type paths and lets you enter and edit type on them.
Character (size, leading, kerning, tracking, vertical/horizontal scale)

Leading is measured from the baseline of one line of text to the baseline of the line above it.
Kerning is the process of adding or subtracting space between specific pairs of characters.
Tracking is the process of loosening or tightening the spacing between the characters in selected text or an entire block of text.
Create Type Outlines

Turning text into outlines makes it appear as though your text was created with the Pen tool. You want to use this tool when creating logos that will be used frequently by other people or artwork that you may not have control over.
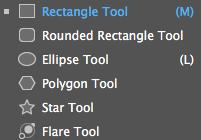
Shape Tools

The Rectangle tool (M) draws squares and rectangles.
The Rounded Rectangle tool draws squares and rectangles with rounded corners.
The Ellipse tool (L) draws circles and ovals.
The Polygon tool draws regular, multi-sided shapes.
The Star tool draws stars.
The Flare tool creates lens-flare or solar-flare-like effects.
Size (resize, constrain proportions. etc.)

Rotate Tool
Rotating an object turns it around a fixed point that you designate. The default reference point is the object’s centre point.
Stroke & Fill
A fill is a colour, pattern, or gradient inside an object. You can apply fills to open and closed objects and to faces of Live Paint groups.
A stroke can be the visible outline of an object, a path, or the edge of a Live Paint group. You can control the width and colour of a stroke. You can also create dashed strokes using Path options, and paint stylised strokes using brushes.
Colour
Vector artwork in Illustrator can have a stroke (border) and a fill. The fill or stroke can be a colour, gradient, or pattern.
Layers (order, naming, colour coding, etc.)

Layers are arranged in a stack in the Layers panel. In the document, content on the layers at the top of the Layers panel appears in front of content on layers that are lower in the panel.Layers allow you to move, edit, hide, lock, and work with content on one layer without affecting content on other layers. To keep it more organised, it allows you to change the name of layers and keep them colour coded, making it easier to find the right layer that you need to edit or work on later on.
Pathfinder (minus front, unite)
Pathfinder effects let you combine multiple objects using interaction modes. When you use Pathfinder effects, you can’t edit the interactions between objects.
Place
Illustrator recognises all common graphic file formats. Tight integration between Adobe products and support for a wide variety of file formats, makes it easy to move art from one application to another by importing, exporting, or copying and pasting.
The Place command is the primary method of importing, because it provides the highest level of support for file formats, placement options, and colour.
Clipping Mask (make, release)
A clipping mask is an object whose shape masks other artwork so that only areas that lie within the shape are visible.


I tried my own clipping masks within Illustrator. I used one of the basic shapes with a galaxy pattern. I then turned the text in to an object and then used a sunflower pattern, as well as drawing a llama with the pen tool and adding a floral pattern to that.
After getting the hang of it, it is really easy to do.
Live Trace / Live Paint

Image Trace lets you convert raster images (JPEG, PNG, PSD etc.) to vector artwork. Using this feature, you can easily base a new drawing on an existing piece of artwork by tracing it. For example, you can convert the image of a pencil sketch you've drawn on paper into vector artwork using Image Trace.
Converting your artwork to Live Paint groups allows you to colour them freely, as you would a drawing on canvas or paper. You can stroke each path segment with a different colour and fill each enclosed path (note, not just closed paths) with a different colour, pattern, or gradient.
The Live Paint Bucket tool (K) paints faces and edges of Live Paint groups with the current paint attributes.
The Live Paint Selection (Shift-L)tool selects faces and edges within Live Paint groups.
Gradient Style
A gradient is a graduated blend of two or more colours or tints of the same colour. You can use gradients to create colour blends, add volume to vector objects, and add a light and shadow effect to your artwork. In Illustrator, you can create, apply, and modify a gradient using the Gradient panel, the Gradient tool, or the Control panel.
Linear Use this gradient type to blend colours from one point to another in a straight line.
Radial Use this gradient type to blend colours from one point to another point in a circular pattern.
Freeform Use this gradient type to create a graduated blend of colour stops within a shape in an ordered or random sequence such that the blending appears smooth and natural. Freeform gradient can be applied in two modes:
Points: Use this mode to shade the area around a colour stop.
Lines: Use this mode to shade the area around a line.

Transparency
You can add transparency to artwork by doing any of the following:
Lowering the opacity of objects so that underlying artwork becomes visible.
Using opacity masks to create variations in transparency.
Using a blending mode to change how colours interact among overlapping objects.
Applying gradients and meshes that include transparency.
Applying effects or graphic styles that include transparency, such as drop shadows.
Importing Adobe Photoshop files that include transparency.
Pencil Tools (smooth, etc)

The Shaper tool turns natural gestures into vector shapes.
The Pencil tool (N) draws and edits freehand lines.
The Smooth tool smooths Bezier paths.
The Path Eraser tool erases paths and anchor points from the object.
The Join tool joins two paths together.
Brushes

Brushes let you stylise the appearance of paths. You can apply brush strokes to existing paths, or you can use the Paintbrush tool to draw a path and apply a brush stroke simultaneously.
There are different types of brushes in Illustrator: calligraphic, scatter, art, pattern, and bristle.
Effects (3D, shadow, drop shadow, inner glow, blur, texture)

3D - Convert open or closed paths, or bitmap objects, into three-dimensional (3D) objects, which you can rotate, light, and shade.
Blur - Retouch images and smooth transitions by averaging the pixels next to the hard edges of defined lines and shaded areas in an image.
Texture - Give an image the appearance of depth or substance, or add an organic look.
Inner Glow - Applies a glow that emanates from the inside edges of the selection.


Comments